


There are many ways to play retro games on a PC, such as using the Polymega or dedicated dumping devices like the Retrode 2. However, I believe the “Retro Freak” is the best solution for dumping ROMs.
In this article, I will explain why I chose the Retro Freak for dumping games and provide a step-by-step guide on how to extract ROM data to your PC using it.
1. Why I Chose “Retro Freak” for Dumping
I considered various devices like the Retrode 2 and Polymega, but here are the three main reasons why Retro Freak is the winner.
Reason 1: Superior Cost Performance
Dedicated dumpers like the Retrode 2 are expensive and often hard to find. The Polymega is fantastic but costs over $500 (and is often out of stock). The Retro Freak costs around $200 and supports 11 different consoles out of the box. You get a console AND a universal dumper in one package.
Reason 2: Massive Compatibility
With just one unit, you can dump games from:
- Famicom (NES)
- Super Famicom (SNES)
- Game Boy / Game Boy Color / Game Boy Advance
- Mega Drive (Genesis)
- PC Engine (TurboGrafx-16)
No other dumper offers this versatility without buying expensive add-on adapters.
Reason 3: Speed and Ease of Use
Dumping a game takes only seconds. The connection is stable, and the process is as simple as inserting a cartridge and clicking a button.
2. What You Need for Dumping
To turn your Retro Freak into a dumper, you need the following items:
- Retro Freak Cartridge Adapter: The main body with the cartridge slots.
- USB Extension Cable (Type-A Male to Type-A Female): To connect the adapter to your PC. Note that a standard Mini-B cable connects to the controller port, which is NOT what we use here. We need to connect to the “Main Unit” port on the back.
- A Windows PC: Windows 10 or 11 is recommended.
- RetroFreak Dumper Software: A free tool created by the community. (Please search for “rfdumper” online).
3. How to Connect Retro Freak to PC
This is the tricky part that confuses many people.
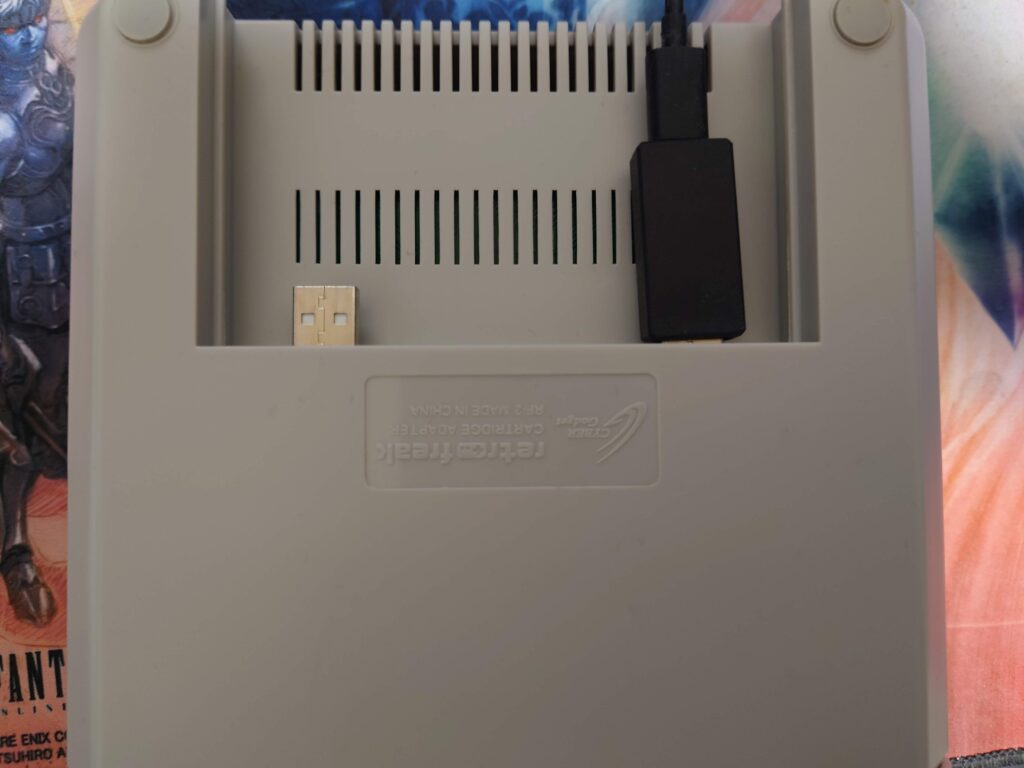
You do NOT connect the USB cable to the controller ports on the front. Instead, you must unplug the small “Retro Freak Main Unit” (the tiny console) from the back of the Cartridge Adapter.
Once removed, you will see a USB Type-A Male connector sticking out from the back of the Adapter. Connect your USB Extension Cable here, and plug the other end into your PC.

4. Installing the Driver and Dumper Software
In most cases (Windows 10/11), no manual driver installation is needed.
- Just connect the USB cable. Windows should automatically set up the device.
- Once connected, check your Device Manager. If you see “Retro Freak” (or a generic USB device) without any error icons, you are ready to go.
- Unzip the RetroFreak Dumper software (`rfdumper.exe` or similar) you downloaded.
*If your PC absolutely refuses to recognize the device, see the FAQ section below.
5. Dumping Your Games (Step-by-Step)
Now, let’s dump a game!
Step 1: Launch the Software
Run rfdumper.exe. If your connection is correct, the status bar should say “RetroFreak Detected”.
Step 2: Insert a Cartridge
Insert your game cartridge (e.g., Super Mario World) into the SNES slot. Insert it gently but firmly.
Warning: Never insert two cartridges at the same time! This can damage the adapter.
Step 3: Recognize and Dump
The software usually auto-detects the game title. If it shows “Unknown”, try cleaning the cartridge contacts.
Click the “Dump” button. Select where to save the file.
- SFC/SNES games: Takes about 3-5 seconds.
- GBA games: Takes about 10-20 seconds.
Once the progress bar hits 100%, you will have a clean ROM file on your PC!
6. Conclusion: Build Your Digital Library!
By dumping your games, you protect your precious collection from cartridge battery failure and physical degradation.
Plus, playing these ROMs on a PC emulator allows for 4K upscaling, save states, and rewind features that the original hardware could never dream of.
Now that you have your ROMs, why not set up the ultimate emulation environment? Check out my guide below!
Recommended Reading
Ultimate PC Retro Game Guide (Japanese)
Learn how to set up Mesen, Snes9x, and other emulators to play your dumped games in 4K resolution.
FAQ: Common Issues
- Q: My PC doesn’t recognize the adapter automatically.
- A: Try a different USB port first. If that fails, some users report success using a tool called Zadig to manually install the
WinUSBdriver. However, this is usually not necessary for modern Windows systems.
- Q: Can I use the files installed on the microSD card?
- A: No. The files installed directly by the Retro Freak console to the microSD card are encrypted. They will not work on PC emulators. You must use the USB cable + PC method described in this guide to get clean ROMs.
- Q: Is this legal?
- A: In many regions, making a personal backup of a game you physically own is considered fair use. However, distributing or downloading these files is illegal. Please use this guide only for your own collection.

コメント